
Old locks pose a threat of giving away to minimal force to people attempting to break into your home. Also, they are hard to operate due to worn out pins and latches. Besides, if they are not the best quality, you might find them rusting away. When faced with old locks, damaged or broken latches, then you go for a lock replacement. So, do you really need an expert to help you replace your locks, or you can do that yourself? There are many ways to go about a lock replacement, one of which we provide. We assure you that you will be as good as your local locksmith when it comes to lock replacement with these steps.
So, how do you replace your deadbolt lock?
First, visit your hardware store and get a new one.
The first step to any lock replacement process is to buy the replacement lock. You wouldn’t want to remove your old lock, only to start panicking about how you would go to the store. When you buy your lock, you can always go for a similar lock or a new type. If you are going for a new one, you would need some extra tools to make changes to your door’s measurements. However, if you are getting a replacement, then check to ensure all the components. Ensure you have all the pins, the cylinder, mounting hardware, and the turn assembly.
Remove the old lock carefully.
When you get home from your local shop, wear some protective clothing, including gloves and eye protection glasses. Then, loosen the screws holding the old lock in place. For a deadbolt lock, these screws are on the top side of the turning assembly. Once they are out, remove the metal plate holding it into place, and carefully remove the lock cylinder. After this, now you can see through the hole on the door to the other side.
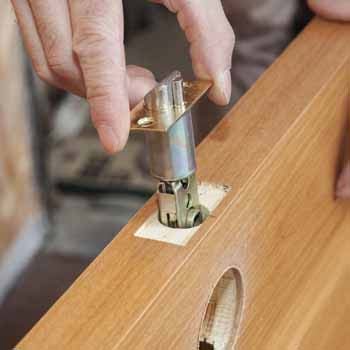
Now, carefully install the new lock cylinder.
From now, we will be doing everything with some caution and attention to the layout of the lock. Once everything is out of the way, carefully install the new lock cylinder. With the latest models, all you need to check is the side written ‘up’ and fit it in that orientation. Follow up the cylinder with the deadbolt and fix it in place. The adjustment is critical if you want to get the job done correctly and save you the time of opening and reinstalling the lock again.
Then, insert the deadbolt bar.
When you have safely secured the lock cylinder and the deadbolt on the door, you can then fix the new deadbolt lock. The extension goes through the deadbolt itself. Also, make sure you pay attention to the orientation. Make sure that your keyhole is in line. On the other end, the bar moves into the turning assembly. Once the turning plate is in place, you can turn it until you see the original screw holes on the door. When you find them, then screw in the plate and get ready to test the lock.
Finally, test the new lock.
When you finish replacing the lock, you need to ensure that the lock you installed is up to the task. That means you carry out a series of tests on the door before going on with the rest of your day. To start, you can insert the key and see if the latch opens and closes from the door. Then, you need to repeat this procedure with your door locked. This measures the alignment on the lock and the strike plate on the wall. Then, check to ensure that the lock is firmly in its place and there are no movements on the clasp. If you are good to go, then you can process to having a drink. However, if you encounter problems with the opening or closing of the lock, you need to go back to the drawing board and check for any misalignments.
Finishing
If you scrape a part of the paint on your door, scratched the wall in the process, or removing or reinstalling the locks, then you might need to touch out the color. Sand the area and fill any holes. Then apply a coat of paint on the wood, avoiding the lock at all cost.